

The first contact your customer makes with your product the moment they open the package is a conversion moment that most brands overlook. In a well-designed experience, this moment goes beyond an ordinary package opening and turns into a gift ritual; it raises perceived value and fuels social media sharing and repeat purchases. In this guide, we answer the question "how to create an unboxing experience" step by step, within a realistic timeline and cost framework, from brief preparation to mass production.
The realistic framework is this: a price quote within 24 hours after a clear brief, a physical sample within 7–15 business days, and going live with the new unboxing setup along with production in approximately 4–8 weeks is a typical timeframe for premium brands working with us in Turkey. On the cost side, while the unit cost for low-volume premium printed cardboard boxes can rise to the 20–40 TL + VAT band in many projects, it is possible to stay at levels of 20 TL + VAT for simpler e-commerce shipping boxes. Unit cost scales according to the type of cardboard/paperboard, grammage, printing technique, and order quantity.
Table of contents
Before You Start: Prerequisite Checklist
The technical and strategic prerequisites you need to clarify before diving into design will determine every subsequent decision. When these items are ready, both the brief and the costing proceed much more soundly.
- Product inventory and variants: How many different products do you have, in what sizes and weights; will there be in-package sets? This information directly determines the box size and construction.
- Sales channels: List channels such as e-commerce, retail, marketplaces, corporate gifts, and the packaging expectations of each.
- Brand tone and story: Minimal, playful, luxurious, or natural — clarify your brand personality, color palette, and key messages.
- Packaging types: Determine your main carriers such as corrugated cardboard boxes for outer shipping, paperboard boxes or printed cardboard boxes for an inner gift feel, and paper bags for carrying.
- Material and grammage: In foldable cardboard boxes, the 250–400 gsm range, especially the 300–350 gsm levels, is a common benchmark for premium retail boxes.
- Budget band: Roughly define the TL budget you can allocate per unit and the total order quantity; keep in mind that the 20–40 TL + VAT range is typical for premium printed boxes.
- Regulation and safety: For food, cosmetic, or textile products, clarify upfront the material and ink requirements compliant with Turkish and, if necessary, EU legislation.
- Operations and logistics: Determine topics such as your storage space, hand-packing process, shipping volume, and consolidated shipment needs.
Once this inventory is complete, proceeding with an end-to-end packaging partner like us not only speeds things up; it makes data-driven costing possible instead of guesswork. If you would like a deeper look at pricing dynamics, you can review our custom box production cost guide.
Step by Step: Building the Unboxing Experience
1. Define the Business Goal and KPIs
Before starting the unboxing design, determine which business goal this investment will serve: repeat purchase rate, social media engagement, premium perception, or reducing the return rate. When the goal is clear, design decisions proceed result-oriented rather than "for show," and you avoid unnecessary cost layers.
2. Break the Unboxing Architecture Into Layers
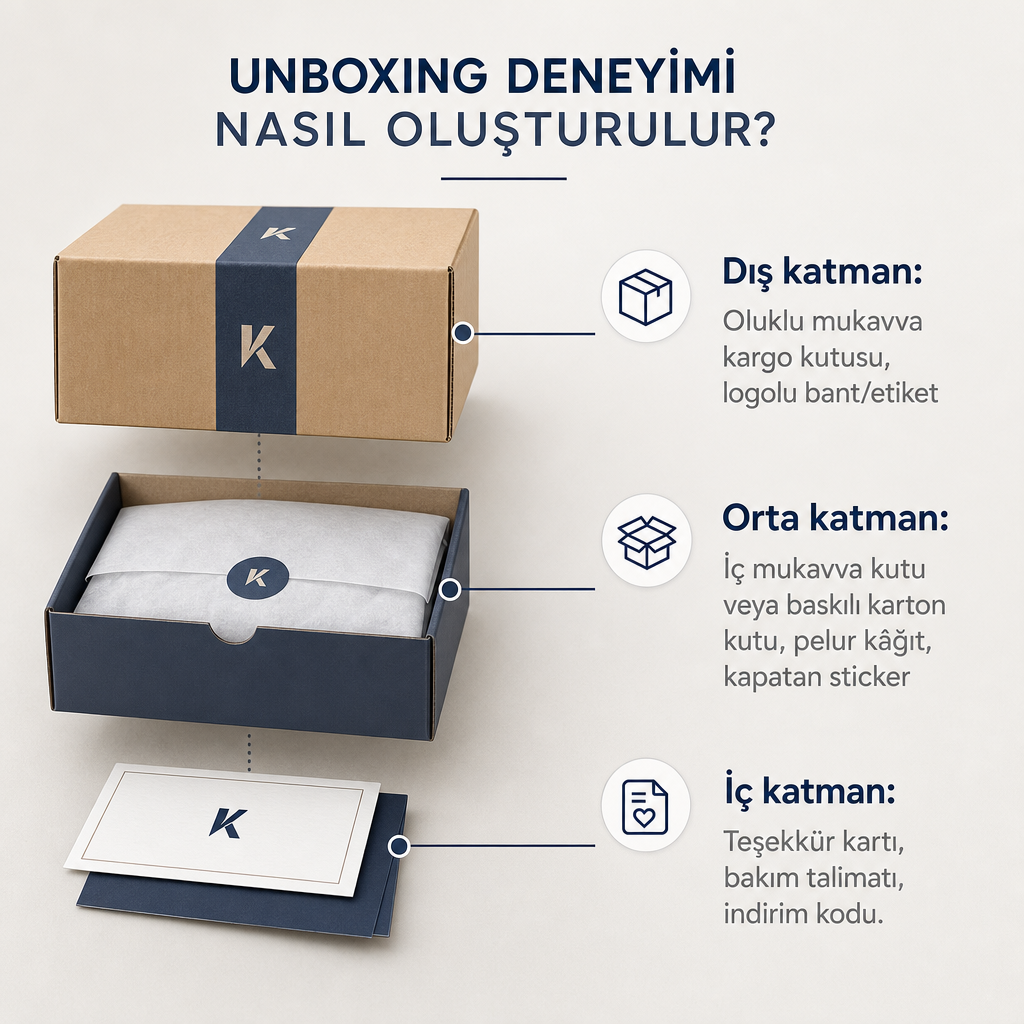
A successful unboxing usually consists of three layers. The outer layer carries the shipping and first impression: corrugated cardboard shipping box, logoed tape or label, cleanly placed shipping label — the aim is safe transport and the brand's first appearance. The middle layer creates the gift feel: the inner paperboard box or printed cardboard box, soft-textured tissue paper, and a small closing sticker. The inner layer is the personal touch: a thank-you card, care instructions, a short note telling the brand story, or a special code for the next purchase. This last layer is the element that establishes the emotional bond with the customer.
Our product range includes packaging types suitable for planning all these layers under one roof, such as paperboard boxes, cardboard boxes, paper bags, labels, tissue paper, thank-you cards, and dividers.
3. Choose the Right Box Type and Material
The product's usage scenario determines the right box type. For jewelry, premium cosmetics, and gift sets, thick cardboard or paperboard boxes offer high perceived value and a solid feel. In cosmetics, food, and personal care, printed cardboard boxes stand out in terms of shelf compatibility and economical production. In e-commerce shipments, corrugated cardboard boxes are a common choice because they provide both shipping protection and a wide unboxing surface.
For material, you can determine the cardboard grammage (e.g., 300–350 gsm) and the flute type in corrugated cardboard (E, B, etc.) together with our technical team according to product weight and transport conditions. To compare packaging options suitable for unboxing, we recommend taking a look at our branded unboxing packaging solutions guide.
4. Plan the Construction and Die Investment
Box construction — closure style, auto-bottom, lock systems — affects both the unboxing rhythm and the cost. Ready-made dies are usually sufficient for cardboard boxes with standard tuck-flap lids and no additional die cost is required. For custom auto-bottom boxes, a one-time die/set-up cost may occur in the 8,000–25,000 TL range; this cost is amortized per unit starting from the first order. For boxes requiring custom sizes and forms, our structural design and prototyping capacity helps you consider unboxing rhythm and cost optimization together.
5. Design the Graphic Design and Print Layers
One of the elements that makes the experience memorable is the visual language and print effects on the box. A legible logo placement and clear typography in harmony with your brand colors introduce your brand at first glance. On dark kraft or black backgrounds, metallic Pantone ink and local metallic areas over soft-touch/matte lamination noticeably strengthen the luxury effect. Textural surprises such as spot UV, embossing, and printing on the inner surface allow discovering new details as the box opens. Our high-precision proofing processes for color help you foresee how the design will look on the actual box and reduce the risk of color inconsistency.
6. Prepare a Brief and Get a Quote
Proceed with a clear brief to bring the experience to life. Prepare a document summarizing your products, target customer profile, sales channels, and brand story in a few paragraphs. List the problems you experience with your current packaging — quality, logistics, sustainability, unboxing — as bullet points. Note the box types you envision, estimated quantities, and your budget band. Based on this brief, we usually send a project-specific price quote within 24 hours; during the quote stage, the production process, sample process, and delivery model are also clarified.
7. Test Prototypes and Pilot Shipments
Trying the physical sample both on the desktop and in a real shipping scenario is a critical step. Examine the sample under different lighting conditions; evaluate print quality and color tones. Test the box-opening rhythm — lid feel, sound, wrapping layer, product placement — with a few people; take notes if there is unnecessary friction, hard-to-open sections, or confusing interior placement. By making a small pilot shipment, observe the impacts the box takes during shipping and customer feedback. Since our prototyping process is designed to provide a physical sample within 7–15 business days according to the brief, you can realistically review your design before going live.
8. Final Production, Quality Control, and Logistics
After sample approval, the mass production and shipping plan kicks in. Provide the final size and color approvals before production; agree on technical tables and recommended grammages. Determine your acceptance criteria for quality control during the production process: print errors, cutting deviations, gluing problems. Create a clear plan for consolidated delivery, inventory management, and reorder thresholds for storage and shipping. This cycle ensures that your unboxing experience is sustainably repeated and brand consistency is maintained. If you want to deepen the technical details on the printing side, our printed cardboard box production guide is a good starting point.
Common Mistakes and Suggested Solutions
- Choosing too large a box: A box too large for the product creates empty space inside and a weak premium perception. Determine dimensions specifically according to the product set and use dividers.
- Insufficient grammage: Thin cardboard or weak corrugated board can cause deformation during shipping. Consider working with 300–350 gsm cardboard and an appropriate flute type.
- Complicated unboxing flow: Too many layers or incomprehensible placement turns the experience into a chore rather than a pleasure. Redesign to reduce the box opening to 3–4 clear steps.
- Color inconsistency: Colors that vary across different print batches damage premium perception. Work with a supplier that has strong color management and proofing processes.
- Underestimating cost: Budgeting without accounting for the die/set-up costs required for custom construction or auto-bottom leads to surprise costs. Include die investments in the 8,000–25,000 TL band in your plan.
When DIY, When a Professional Partner?
In some scenarios, a simple do-it-yourself setup is sufficient. Very low-volume, early-stage e-commerce ventures; use of a single product type and standard shipping box; a minimal brand touch built with branded tape, simple stickers, and ready-made boxes fall into this group. In these cases, you can build unboxing at a basic level with stickers, tape, and simple thank-you cards; custom construction and high print investment may not be required.
However, under the following conditions, working with a professional packaging partner becomes much more rational: brands positioned in the premium or luxury segment such as cosmetics, jewelry, chocolate, fashion, and similar; the need for consistent unboxing across multiple channels; projects requiring custom-size and custom-form paperboard boxes, cardboard boxes, or set boxes; advanced requirements such as regulatory compliance, sustainable material selection, and carbon footprint reporting; the expectation of a quick quote and a physical sample in a short time. In such projects, working with a professional supplier reduces design errors, optimizes long-term unit costs, and lowers operational risk.
You can use this guide as the skeleton of your own brief that you will share with us. Once your product, channel, and target quantity are clear, all you need to do is send us this information so we can produce a realistic quote and sample plan with a custom size, material, and print combination for you.
Frequently Asked Questions
How is an unboxing experience created, where should I start?
First, clarify your products, sales channels, and brand tone and prepare a brief. Then, by planning layers such as the outer shipping box, the inner paperboard/cardboard box, tissue paper, and cards, you can request a quote and sample from us.
What is the typical timeline for such a project?
In projects where the brief is clear, a quote within 24 hours, a physical sample within 7–15 business days, and then, with the production process, the new unboxing setup can be brought to life in approximately 4–8 weeks in total.
Approximately how much is the unit cost?
For premium printed cardboard boxes, the unit cost for small quantities can rise to the 20–40 TL + VAT band in most scenarios; for simpler e-commerce shipping boxes, levels around 20 TL + VAT are often seen. The exact figure is clarified in a project-specific quote based on the combination of size, material, printing technique, and quantity.
What is the difference between a paperboard box and a cardboard box in terms of unboxing?
Paperboard boxes, with their thicker and more rigid structures, provide high perceived value and a solid feel in jewelry, premium cosmetics, and gift sets; cardboard boxes, on the other hand, offer lighter, shelf-compatible, and economical solutions.
Should I go directly into production without getting a sample?
Not recommended. Testing color, construction, and unboxing rhythm in real life with the physical samples we provide within 7–15 business days significantly reduces the risk of errors before mass production.